
This guide is designed to help you configure your camera for optimal video recording during a meetup event, mainly focusing on manual settings to ensure consistent exposure, audio quality and projected presentation recording throughout the session.
Preparation:
Before going to the event, ensure your SD card is large enough to store a video of at least 90 minutes. A standard, Full HD video (1080p) file can range from approximately 15 GB to 30 GB per hour, depending on the bitrate. For a 90-minute event, a 32 GB card should suffice, but using a 64 GB card or larger is recommended for extra security.
We can only accept cameras with detachable lenses (between f/2.8 and 4.0) or camcorders with internal zoom lenses (between f/1.6 and 4.0), which can take 2 cards and enable double-slot recording with rec709 colour space.
Expect for long rooms (presenter is from 5-6m / 20-25feet from the lens); hence, if you’re using a detachable lens camera, you’ll need a lens with an Image Stabiliser function somewhere between 50mm and 200mm (35mm eqv. full frame). When possible, we will send you the room dimensions days before your event so you’ll know what lens to carry.
Always arrive a bit earlier to the venue, be polite to the speakers and clients as you are representing MEETUPVIDEO there.
Camera position and stability:

Example how to follow the speaker:
Try to use high profile tripod (at least 165 cm height) if necessary to avoid people’s head in framing. Do not use tripod which designed for photography with ball head.

Follow the rule of thirds, a classic composition technique.
This is a good composition:

Camera Settings:
Click here to see our preferred SONY FX3 & FX30 settings for meetups
Click here to see our preferred Canon R5 & R5C settings for meetups
-
- ISO:
Keep the ISO as low as possible to reduce noise. Start with ISO 320 or 800 and only increase if necessary.
It is best if you can use the native ISO or GAIN of your camcorder. - Frame Rate
Always use 29.97 or 59.94 fps! (In UK too, as delivery platform is mostly Youtube.) - Shutter Speed:
Set your shutter speed to 1/50th of a second in UK, 1/60th of a second in US to avoid projected screen flicker in the background. - Aperture:
Adjust the aperture to ensure the speaker is in focus while allowing enough light to hit the sensor. A value between f/2.8 and f/5.6 often works well for depth of field and exposure. Avoid higher than f/5.6 !
Incorrect values (F6.3 ISO2500):


If you decrease F-stop then you can reach the same image at lower ISO value, like here:
Correct values (F4 ISO1000):


- White Balance:
Set white balance manually to match the lighting conditions. Do not rely on auto white balance. (Venues use between 3200K and 5500K)


- Focus:
Use manual focus to lock onto the speaker and avoid the camera refocusing during the shoot. If you have camera which was made after 2017, then use Face tracking or Eye auto focus if you have enough light in the room.
- Exposure:
Check the camera’s histogram to ensure the speaker’s face is well-exposed (~40-50 IRE) without being overexposed. Adjust the ISO or aperture if the look is too bright (overexposed).
This is overexposed (also, the white balance was incorrectly set, and the headroom is too ample):


If the recorded footage is slightly darker, it’s still less problematic than overexposed!


Multiple cameras:
For panel session or any multi-camera recording always use the same brand and type of cameras and lenses to achieve seamless switching and avoid extra colour matching during edit:
Close up:

Wide:

Result:
Audio Setup:
Click here to see our preferred Rode Wireless Go 2 settings
-
- Frequency: Always do a frequency search before the event in the venue. If you’re using your own UHF transmitter, avoid to use venues (probably licensed) frequency! Digital devices’ signal sometime drops in 2.4GHz and 5GHz range if WiFi is saturated.
-
- Microphone choice: For two speakers always use two lavalier (lapel) microphones, record each signal as an independent channel!
-
- More than 2 microphones: Use an additional multichannel audio recorder device. Use uncompressed, 48kHz recording formats. If the format is MP3, then minimum must be 192kbps per channel.
-
- Levels: Set the audio levels manually. During soundcheck, have each speaker talk at their loudest and set levels so that the audio peaks around -12dB to -6dB to avoid clipping.
-
- Monitoring: Always monitor the sound with closed headphones (with active noise cancellation is sometimes better) or in ear monitor throughout the recording to ensure audio clarity and quality.
Lighting and Projector:
-
- Light the speaker’s face: Ensure there is even lighting on the speaker’s face. Avoid harsh lights that can create heavy shadows.
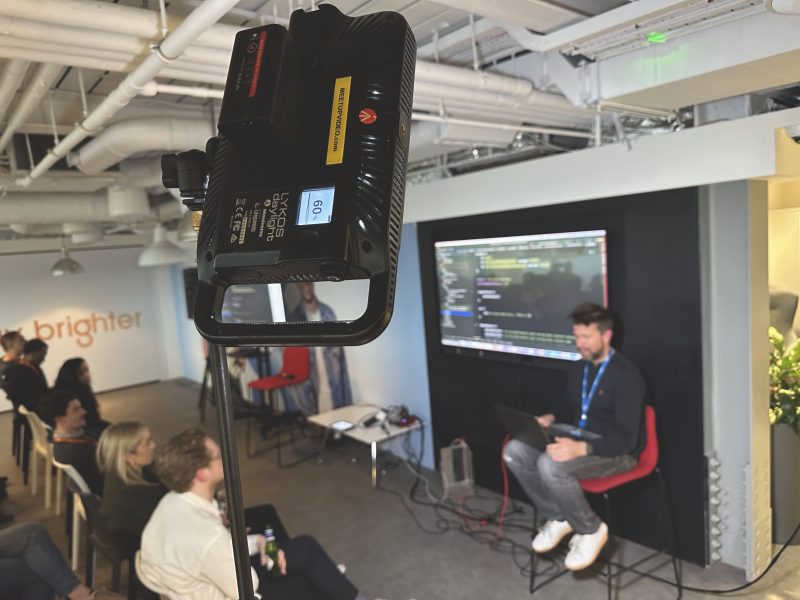
Always handy if you have a small LED light panel with you to use it from the side. Don’t have to use it at 100% power and if possible set to the same colour temperature as room lights, or use it at 5600K for nice separation.Use it from angle, above head

to avoid reflection on shiny surfaces, like LCD TVs:

- Light the speaker’s face: Ensure there is even lighting on the speaker’s face. Avoid harsh lights that can create heavy shadows.
- Avoid projector glare: If the speaker is near a projection screen, ensure the projected light does not fall on them, which can cause overexposure on their face. Also good idea to talk to the speaker before the event to not stand or walk in front of a projected screen / display.


Special considerations for projector use:
If the speaker will interact with a projector, set the camera’s exposure to accommodate for the difference in light between the speaker and the projection. You might need to manually adjust the exposure when the speaker steps in and out of the projector light.
Your main focus should be the speaker, not their projected image or the audience. With 1 camera solution during Q&A, keep the camera always on speaker, not on audience.
Recording:
- Start recording a few minutes before the talk begins to allow for post-editing flexibility.
- If the camera has a limit on continuous recording time, be prepared to stop and start recording during natural breaks in the presentation. We prefer cameras without recording time limit.
- Continuously monitor the camera’s battery life and have spare charged batteries on hand, or use external power, power bank.
Final Checklist:
- SD card is formatted before you go to the event and capacity checked.
- Tripod is secure and at the correct height.
- Camera framed for the rule of thirds. (speaker is on the center 3rd)
- ISO, shutter speed, aperture, and white balance are manually set.
- Audio levels checked with the right microphone setup.
- Lighting is even and the speaker’s face is well-exposed.
- Spare batteries and storage available.
Screen capture
Projected presentation screen’s capture solutions:
Recommended configuration:
1.) SD card/SSD recorder with signal pass-through feature, like ATOMOS NINJA V, ATOMOS SHOGUN 7, Blackmagic Video Assist, ATOMOS ZATO Connect, ATEM Mini Pro, HyperDeck Shuttle HD, etc.: Use H264 or H265 file compression with 1080p recording format at 29.97fps.


Optional configurations:
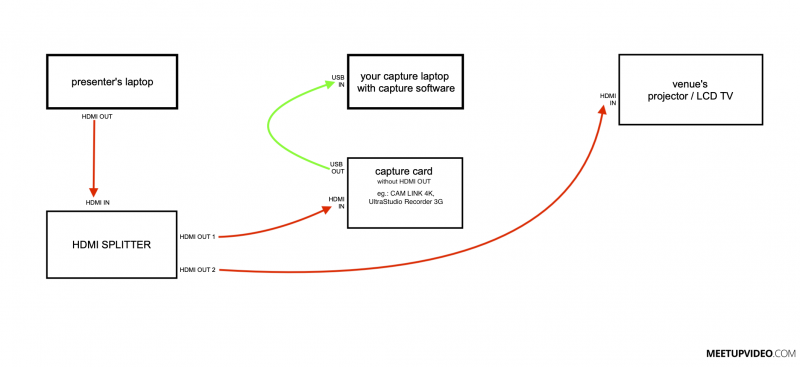
2.) Capture card with HDMI pass-through feature with laptop recording, like Elgato Game Capture HD60 (not the HD60S) :
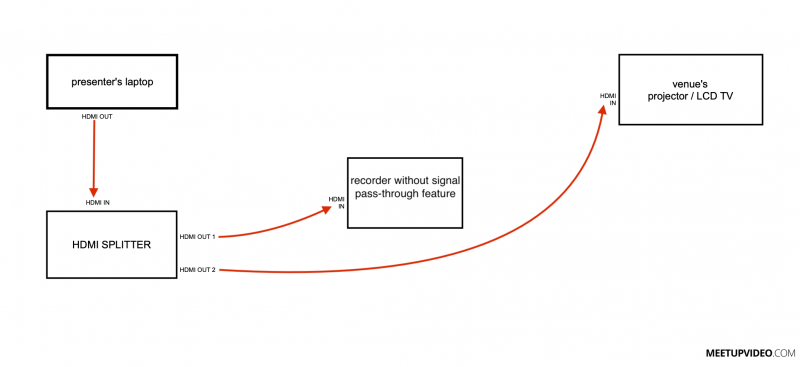
3.) Recorder without signal pass-through feature:

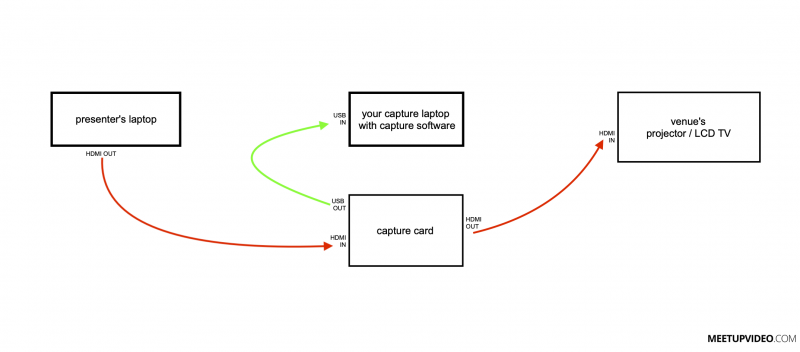
4.) Worst case scenario, not recommended: Capture card without HDMI pass-through feature with laptop recording, like CAM LINK 4K , UltraStudio Recorder 3G, etc. with OBS :
Try to avoid this config.
Important: for presenter’s Apple laptops with USB-C port always use original Apple USB-C Digital AV Multiport Adapter not a cheap aftermarket one!
Do not capture from the new, Apple Silicon based 14-inch or 16-inch Macbook Pro’s HDMI out port directly, because for some reason the recording will stop after 20-30 secs on your ATOMOS device! Connect an Apple USB-C Digital AV Multiport Adapter and capture from its HDMI port.
More complex setup, but the best scenario if you can add a Decimator (with 1080p29.97 settings) between the computer’s HDMI out and ATOMOS’ HDMI in ports.
Please note, the total HDMI cable length between the presenter’s computer HDMI OUT port and projector’s / LCD TV’s HDMI IN port SHOULD NOT exceed 10 meter / 33 feet without signal amplifier / repeater. In some cases venues can provide signal via SDI, hence SDI to HDMI converter, like DECIMATOR MD-HX or a Blackmagic Design Micro converter is useful to have.
Some recorders (like ATOMOS ZATO CONNECT, etc.) are stop their recording process if resolution or frame rate change happen during presentation, or presenter disconnect their laptop.
In this case you should have to restart / continue the recording manually.Atomos Ninja V firmware version should be AtomOS 10.93.00 or above.
Enabling the new “Ignore Audio Dropouts” option via the Audio menu allows the device to continue recording despite the audio dropouts, and it will fill any gaps in the audio track with silence instead of splitting the recording.
In ATEM Mini Pro has resolution and frame rate converter, hence record won’t stop suddenly.
Conclusion:
By following this guide, you should achieve a professional-quality video recording of meetup event with screen feed, clear audio and consistent exposure.
Always run a test recording before the event to ensure all settings produce the desired results.
Compress
If the screen was recorded by an ATOMOS device, then file sizes are huge.
Hence compress the Atomos files only with HandBrake software (https://handbrake.fr) with the following settings:
Click here to download the setting for our Handbrake’s Preset
If you’d like to set your Handbrake manually, then go to our Compression with Handbrake page.
Do not re-convert / compress / modify any in-camera or audio files.
Upload
Always upload the files within 6 hours after recording onto our dedicated dropbox folder (50GB / file limit has been set!):
https://www.dropbox.com/request/aELThWNYpCl76CypqxNS
Do not re-convert / compress / modify any in-camera or audio files.
- ISO:


